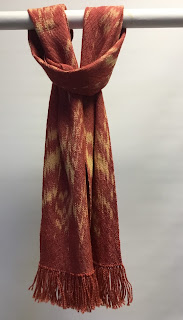
Ikat Warp
MAKING THE WARP
The WARP is 154 ends, 2 ply Maine Alpaca. I added one thread at a time to the warping board, so each these was kept next to it’s neighbor thread.
The warp contains three distinct patterns and was made in three individual sections; A was 90 ends, B was 50, and the third E for edge, was 14 ends.
WEFT is 2 ply silk, dyed to match.
ENDS PER INCH - 24 EPI
LENGTH - 2 1/2 yards
WIDTH in reed - 9”
DYING THE WARP
I folded each or the three warp sections separately, into thirds or fourths and used blocks of wood, A, tongue depressors, B and popsicle, E, as a resist by placing wood on either side of the warp sections and wrapping rubber bands tightly around either end of the wood. This prevents, or resists, the dye from entering the yarn in those sections.
I left the end of each warp out of the resist to keep the ends solid color and because a few inches will be lost in tying on the loom.
The three warps will go into a dye-pot.
THREADING THE REED / INTEGRATING THE 3 WARP SECTIONS
First, I just lined up all the warp threads in order by section A, B and E, and threaded into the reed. This helps me visualize the process.


Starting with the largest # of ends, I divided the A, the 90 end warp bundle, in three equal sections on of 30 end in the reed. I left 29 empty dents between each of the three sections so I could add the threads from B and E.
The 50 end warp bundle, B, was divided in two, 25 ends each, and threaded in between the A sections, leaving 2 spaces on either side for E.
I threaded the 14 end bundle E, as follows: 2 ends between each section and 3 on either end for the selvedge.

The warp on the rear beam of my loom.
ADDITIONAL NOTES
Intermingling A,B and E can seem a little intimidating but I think the results are worth the effort.
Thread 10 (or some small number) of ends at a time in the reed and tie them a loose knot so they don’t escape.
Thread the warp on your loom however you wish.
Lately I have been threading the reed first, tying on to the heddles and winding front to back.
I tie the unthreaded ends of the warp to a heavy object to then wind on. A drill box is really handy. Made of tough plastic, you can vary the weight by adding or removing the drill or battery charger and it will slide on varying floor or surfaces and has handle you can tie the warp to with cord.
If I am continuing with same pattern draft, I tie the new warp on to the remainder of the warp that’s already in the heddles. If you do this, trim the knot ends short, to about 1/4”.
Line up the ends of the warp as best you can for length. I try to keep the unthreaded end knotted together so the dyed areas will line up to some degree. The beauty of this technique is the offset nature of the final design which can only be achieved by hand.

ALTERNATE TYING TECHNIQUES
Use sturdy cord to wrap the warp threads. You can vary the width of each wrapped section. I’ve seen bicycle inner tubes used.
THREAD DENSITY IN REED
The warp has to be fairly dense in the reed for the patten to show well. I’ll often weave an inch or two and take time to assess it. I re-thread closer together if necessary.
Consider doing short warp for your first one. It is easier rethread the reed and wind on again if necessary, because increasing the epi will make the warp narrower. You need to have the warp on the back beam the same width as the width in the reed.

Comments
Post a Comment